Are you puzzled as to why your WordPress website is blacklisted?
We hate to break it to you but it’s likely that your website has been infected with malware.
When search engines or PC antivirus software detect malware on your site, they immediately flag your site as insecure and blacklist it. They do this to protect their users from visiting your malware-infected site because it would put them at risk of being attacked by hackers.
A blacklisted site means your visitors will be prevented from accessing your site. Your traffic and SEO rankings will directly be impacted. Next, your revenue will plummet.
But don’t worry, you can recover your website. To remove the blacklisting, you need to clean up the malware infection on your website immediately. In this guide, we cover all the effective measures you can take to fix your website and remove the blacklisting and take preventive measures.
What is Website Blacklisting?
When your website is blacklisted, visitors of your site are blocked from accessing it.
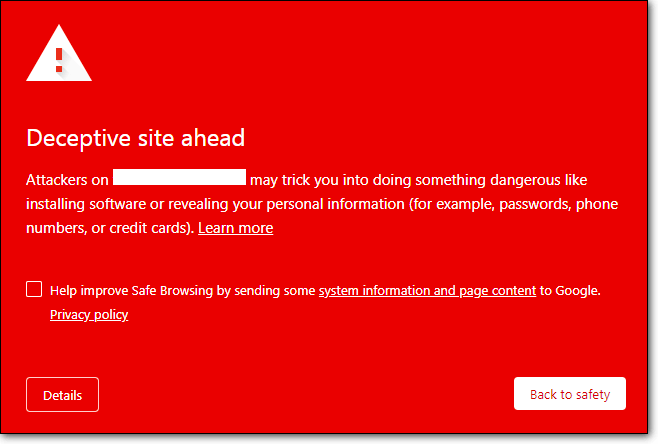
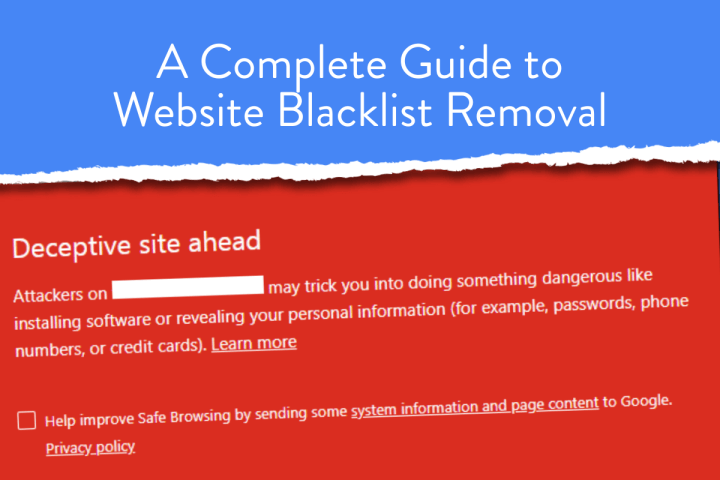
Visitors are either shown a warning message such as ‘this site is hacked’ and prompted to go back to safety or they are completely blocked from accessing your site altogether.
Blacklisting authorities want to protect visitors from accessing malicious or harmful content.
Hacked websites are known to steal sensitive information from visitors or force them to download and install malicious files. Hackers ride on the website’s reputation to execute these activities.
In most cases, hackers hide and disguise their malware so that you, the website owner, are not aware that your site is hacked until it is too late.
When a website is blacklisted, you’ll find blacklist authorities warning users with the following messages:
-
- Deceptive site ahead
- Reported attack page!
- Suspected malware site
- Danger: malware ahead!
- The site ahead contains malware
- The website ahead contains malware!
- This website has been reported as unsafe
- The site ahead contains harmful programs
- This page is trying to load scripts from an unauthenticated source
Unfortunately, there is more than one authority that can blacklist your site. Hence, there are different types of blacklisting that your website may face.
Different Types of Blacklists Your Site Can Face
There are over 100 blacklisting authorities who could be blacklisting your website. The most popular ones are Google and desktop antivirus programs.
i. Google Blacklists Website
Google is the world’s most popular search engine 68% of search engine users of the world.
One of the biggest secrets to their success is that they offer the most relative results to their users. It’s in their best interest to ensure that the content they are offering is not harmful to their users.
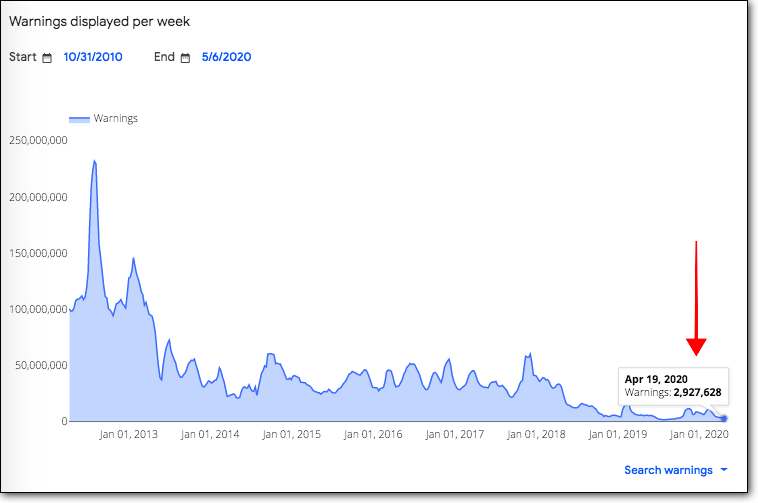
Google has a security division called Safe Browsing that examines billions of websites every day looking for unsafe websites. When they detect such a site, they display warnings on Google Search and on Google Chrome.
Not just that, Google even encourages users to report malicious websites if they come across one.
At the time of writing this, Google is showing 2,927,628 search warnings.
ii. Desktop Antivirus Programs Blacklists Website
Like Google, desktop antivirus programs are responsible to keep their users safe. They prevent users from accessing websites distributing illicit software, malicious payloads, and drive-by-downloads.
Desktop antivirus programs are made to scan and protect computer systems but they have evolved to detect malware in websites and warn users against it.
Blacklist authorities also leverage their networks to spread information about a specific blacklisting.
So, when one authority blacklists a website, it prompts other authorities to investigate the site and flag it. In this way the blacklists compound. Therefore, it’s important to reach out to the original authority and fix the issue.
How To Check If Your Website is Blacklisted?
Many of you reading this article are already aware that your website is blacklisted. In that case, we suggest that you jump straight into the fixing section.
But if you’re not so sure then you can find out by following the steps below.
There are plenty of ways in which you can find out if your website is blacklisted. Those are:
1. Scan Your Site With MalCare
MalCare is the best WordPress security plugin out there because it’s easy to use, works fast, and gives you reliable results. You can install the plugin on your website and scan it. After the scanning process is complete, the scanner will show you the result. And if your website is blacklisted, MalCare will inform you about it.
2. Check Google Search Console
If your website has been blacklisted because of a hack, then Google Search Console should pick up malicious activities on your website. It’ll notify you about it on the Security Issues section.
If you have not set up the Console, then we suggest you do it. It’s a handy tool that picks up errors and security issues.
3. Check Site Status on Google Safe Browsing
Google Safe Browsing is a service provided by Google’s own security team. You can insert your site URL and check if Google has blacklisted your site.
4. Check For Google Search Engine Warnings
When a website is compromised, 95% of your search engine ranking is affected. This is of course because Google is preventing users from accessing your site.
You can do a quick Google search to find out.
There are a few ways to Google search your own website.
You can do a site search where you write this prefix in front of your URL. It should look like this – site:westworldfansite.com
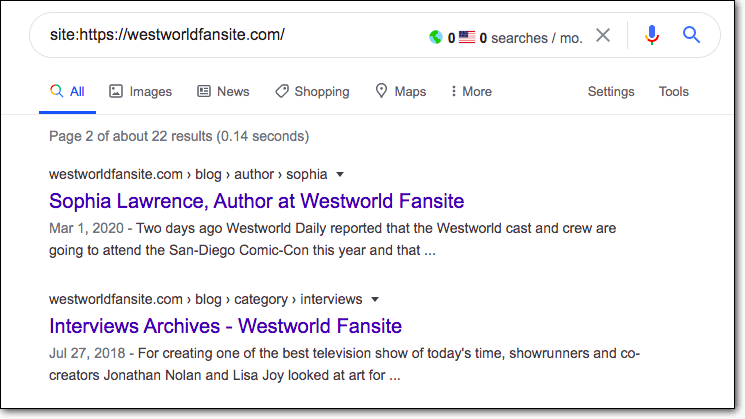
Try accessing your site and see if Google is blocking you.
Alternatively, you can just search for the name of your site on Google search. You can also search for a keyword that your website is ranking for.
Remember to logout of your website when you are doing a site search or looking up a ranking keyword.
5. Check Site Status With Online Tools
There are quite a few tools that can tell you if your site is blacklisted. They are MX Toolbox, Hetrixtools, Blacklistalert, Websitepulse, Ultratools, Invaluement, and Multirbl.valli.
Website Blacklist Removal Guide
Generally, a website is slapped with blacklisting because of the presence of malware. The Google security team says that many of the websites that they determine as unsafe are “legitimate websites that have been compromised by hackers.”
Hence to remove blacklisting you need to fix your hacked site.
Hackers hack websites to use their resources to execute malicious activities like SEO spamming, phishing, redirecting visitors to another site, etc. Therefore, you need to clean your website then make appeals to blacklisting authorities to whitelist your website.
Removing a blacklist from your WordPress website is a 3-step process. The steps are:
1. Scan Your Site
You can scan and clean your hacked website in two ways. You can do it manually or by using a plugin. Manual methods are difficult because you will need to know how WordPress works in order to find and clean the infected files and folders. Moreover, in manual methods, small mistakes can cause your site to break. Therefore, using a plugin is the best way forward.
There are plenty of WordPress Security Plugins that you can use to scan your site. But not all plugins offer a reliable scanner.
MalCare comes with a great WordPress malware scanner and it offers the following features:
(Note: If you have used MalCare to check if your site is blacklisted, then you can skip this section, and head straight to Clean Your Site.)
-
- MalCare is designed to find any type of malware even if it is hidden or disguised.
- It will scan your entire WordPress site including your database. This ensures every inch of your website is covered.
- Lastly, many scanners tend to throw up false alarms because they detect code that can sometimes be malicious but is also sometimes used in certain plugins. MalCare leverages technology that analyses the behavior of code on your website. This eliminates false alarms and gives you accurate results.
To scan your website with MalCare, you need to follow the steps below:
i. Install the plugin on your site.
ii. Select MalCare from your WordPress site dashboard. Insert your email address and start scanning your website.

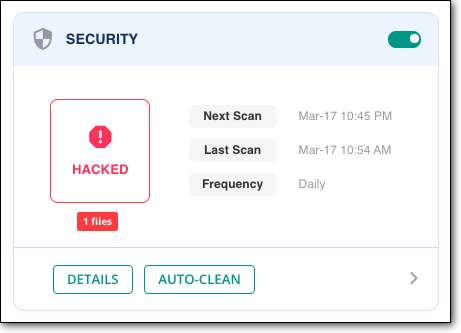
At the end of the scanning process, MalCare will alert you if it finds malware infection on your site.
2. Clean Your Site
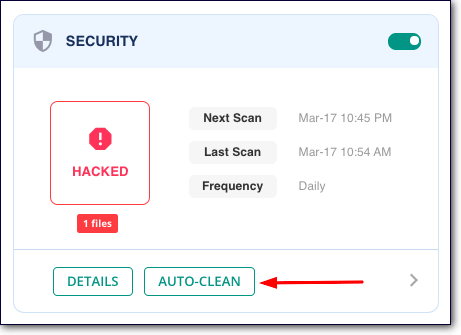
To clean your website, you simply have to click on MalCare’s Auto-Clean button.
With MalCare’s instant automatic malware removal feature, your website will be cleaned immediately.
Malware removal usually entails a lengthy process. Generally, when you use malware removal services, you have to raise a ticket and wait for security personnel to be assigned to your site. They will require you to grant them access to your site. Only then will they begin to clean the malware infection. The entire process can take something between a few hours to a few days!
When a website is hacked, time is of the essence. With MalCare you can avoid this lengthy process.
It has an instant malware removal feature that will clean up your website immediately.
To clean your site, MalCare provides an ‘Auto-clean’ button after it scans your site. Click this button and the plugin will begin the malware removal process.
Please note that cleaning a website is a complex and technical process hence, MalCare’s one-click instant WordPress malware removal is a premium feature. To use the Auto-Cleaner, you need to upgrade.
The plugin will take less than 5 mins to clean the site.
When it’s malware-free, you can submit it for review and removal from blacklisting.
3. Submit Website for Review
We had mentioned earlier that there are over 100 blacklisting authorities but the most popular ones are Google and desktop antivirus programs. Other blacklisting authorities leverage their connection with the popular ones to find and blacklist websites.
Hence, it’s important to appeal to the original authorities to whitelist your website.
i. Appeal to Google
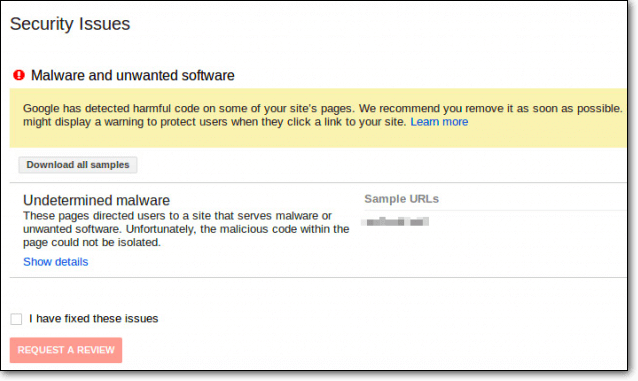
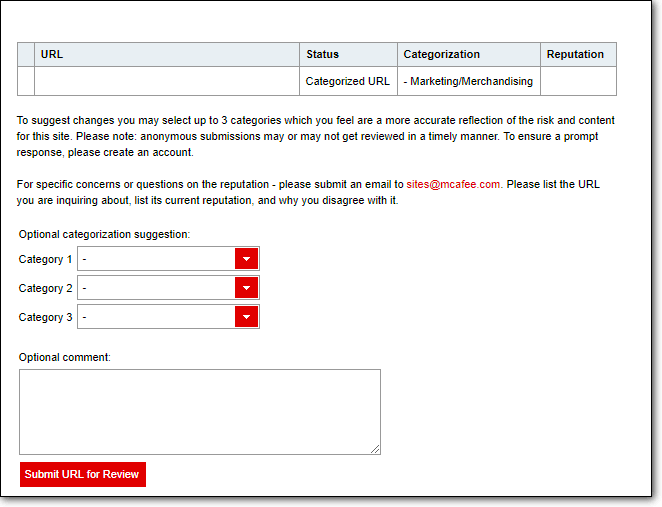
In Google Search Console, you have the option to request a review.
Log into your account and select the Security Issues option from the menu.
Then choose:
I have fixed these issues > Request a Review.
You will be asked to give a detailed review of how you repaired your site.
TIP: We suggest you scan your website again, then take a screenshot of MalCare showing that your website is clean. Submit it along with your review.
It can take Google up to 72 hours to remove the blacklisting.
If you don’t have a Google Search Console account, then you’ll need to create one. We have a guide for you in our Google Blacklist article. Just skip to the section Submitting Website For Google Review.
ii. Appeal to Desktop Antivirus Programs
Two of the most popular antivirus programs are McAfee and Norton.
→ McAfee
To submit your site for review, you need to log in to your McAfee account and select Check Single URL > McAfee SiteAdvisor/WebControl, then enter your website URL.
There will be a comment box, where you can offer details of the steps you took to fix your website.
McAfee takes up to 3 to 5 days to remove the blacklisting. In the meanwhile, you can check your site status by clicking on Track URL Ticket Status on the dashboard.
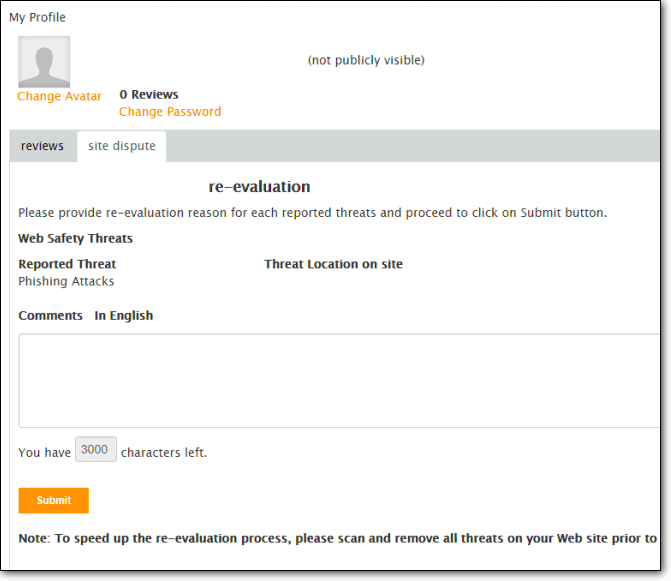
→ Norton
Another extremely popular desktop antivirus software is Norton. To submit your site for review, you need to log in to your Norton account. Then go to My Profile > Site Dispute > Add Site.
Once you add the site, you will be asked to verify the ownership of the site. You can do that by adding a meta tag in the header of the website.
After verifying ownership, you need to click on re-evaluate my site. In the comment section, enter a brief description of how you cleaned your hacked site.
Then hit Submit.
With that, we wrap up our website blacklist removal guide. If you take the steps that we have listed above, we’re confident that your website will be whitelisted and back to business.
What’s Next?
While the situation at hand has been dealt with, there is no guarantee that your website will never be hacked and blacklisted again.
That is if you don’t take security measures.
We strongly suggest that you follow this guide on WordPress security to take the right security measures.
One of the most important steps to ensure that your website remains hack-free is to install a WordPress security plugin like MalCare.
It scans your website on a daily basis, prevents hackers and bots from accessing the site using a firewall, and lets you implement site hardening measures, among other things.
Would you like us to address any specific topics? Drop us a tweet and we’ll be there for you.
The post A Complete Guide to Website Blacklist Removal appeared first on MalCare.
*** This is a Security Bloggers Network syndicated blog from MalCare authored by Sufia Banu. Read the original post at: https://www.malcare.com/blog/website-blacklist-removal/
"complete" - Google News
May 29, 2020 at 03:59PM
https://ift.tt/2XJh0hJ
A Complete Guide to Website Blacklist Removal - Security Boulevard
"complete" - Google News
https://ift.tt/2Fvz4Dj
https://ift.tt/2YsogAP
Bagikan Berita Ini


0 Response to "A Complete Guide to Website Blacklist Removal - Security Boulevard"
Post a Comment